Blog

  • openapi-typescript with Angular Resource

    Angular 19 introduces Resource, an async signal, typically used for web requests. I find it reminiscent of TanStack Query but more minimalist and signal based. While RxResource works great with Angular HTTPClient, the regular “Resource” works with good old fetch. Which means we can combine it with openapi-typescript and openapi-fetch. The result will let us quickly grab typed API resources and process them with Angular Signals, no rxjs needed.

    Follow openapi-fetch’s documentation to install and generate your openapi types. I called mine src/app/api/api-schema.d.ts. Then create a file such as src/app/api/api.ts

    import createClient from "openapi-fetch";
    import type { paths } from "./api-schema";
    
    export const client = createClient<paths>();
    

    Let’s imagine fetching a Foo api in a Service.

    export class FooService {
      foosResource = resource({
        loader: async () => {
          const { data, error } = await client.GET("/api/foo/");
          // Consider error handling here
          return data
      })
      foos = computed(() => this.foosResource.value() || [])
    }
    

    Our foos will be typed according to the openapi spec. We can also refer to the types directly:

    import type { components } from "src/app/api/api-schema";
    type Foo = components["schemas"]["FooSchema"];
    

    With this approach, we can easily get typed API data into Angular and it looks more like any other JS framework code.

  • Monitor network endpoints with Python asyncio and aiohttp

    Monitor network endpoints with Python asyncio and aiohttp

    My motivation – I wanted to make a network monitoring service in Python. Python isn’t known for it’s async ability, but with asyncio it’s possible. I wanted to include it in a larger Django app, GlitchTip. Keeping everything as a monolithic code base makes it easier to maintain and deploy. Go and Node handle concurrent IO a little more naturally but don’t have any web framework even close to as feature complete as Django.

    How asyncio works compared to JavaScript

    I’m used to synchronous Python and asynchronous JavaScript. asyncio is a little strange at first. It’s far more verbose than just stringing along a few JS promises. Let’s compare this example of JS and Python.

    fetch('http://example.com/example.json')
      .then(response => response.json())
      .then(data => console.log(data));
    async def main():
        async with aiohttp.ClientSession() as session:
            async with session.get('http://example.com/example.json') as response:
                html = await response.json()
                print(html)
    loop = asyncio.get_event_loop()
    loop.run_until_complete(main())

    There’s more boilerplate in Python. aiohttp has three chained async calls while fetching JSON in JS requires just two chained promises. Let’s break these differences down a bit

    • An async call to GET/POST/etc the resource. At this time, we don’t have the body of the request. fetch vs sessions.get are about the same here.
    • An async call to get the body contents (and perhaps process them in some manner such as converting a JSON payload to a object or dictionary). If we only need say the status code, there is no need to spend time doing this. Both have async text() and json() functions that also work similarly.
    • aiohttp has a ClientSession context manager that closes the connection. The only async IO occurs when closing the connection. It’s possible to reuse a session for some performance benefit. This is often useful in Python as our async code block will often live nested in synchronous code. Fetch does not have this (as far as I’m aware at the time of this writing).
    • get_event_loop and run_until_complete allow us to run async functions from a synchronous code function. Python is synchronous by default, so this is necessary. When running Django or Celery or a python script, everything is blocking until explicitly run async. JavaScript on the lets you run async code with 0 boilerplate.

    One other thing to note is that both Python and JavaScript are single threaded. While you can “do multiple things” while waiting for IO, you cannot use multiple CPU cores without starting multiple processes, for example by running uwsgi workers. Thus in Python it’s called asyncio.

    Source: docs.aiohttp.org

    Network Monitoring with aiohttp

    Network monitoring can easily start as a couple line script or be a very complex, massive service depending on scale. I won’t claim that my method is the best, mega-scale method ever, but I think it’s quite sufficient for small to medium scale projects. Let’s start with requirements

    • Must handle 1 million network checks per minute
    • Must run at least every 30 seconds (smaller scale this could probably go much shorter)
    • Must only run Python and get embedded into a Django code base
    • Must not require anything other than a Celery compatible service broker and Django compatible database

    And a few non-functional requirements that I believe will help scale

    • Must scale to run from many servers (Celery workers)
    • Must batch database writes as efficiently as possible to avoid bottlenecks
    Overview of architecture

    A Celery beat scheduler will run a “dispatch_checks” task every 30 seconds. Dispatch checks will determine which “monitors” need checked based on their set interval frequency and last check. It will then batch these in groups and dispatch further parallel celery tasks called “perform_checks” to actually perform the network check. The perform_checks task will then fetch additional monitor data in one query and asynchronously check each network asset. Once done, it will save to the database using standard Django ORM. By batching inserts, we should be able to improve scalability. It also means we don’t need a massive number of celery tasks, which would be unnecessary overhead. In real life, we may only have a few celery works for the “small or medium scale” so it would waste resources to dispatch 1 million celery tasks. If we batch inserts by 1000 and really have our max target of 1 million monitors, then we would want 1000 celery workers. Another variable is the timeout for each check. Making it lower, means our workers get done faster instead of waiting for the slowest request.

    See the full code on GlitchTip’s GitLab.

    Celery Tasks

    @shared_task
    def dispatch_checks():
        now = timezone.now()
        latest_check = Subquery(
            MonitorCheck.objects.filter(monitor_id=OuterRef("id"))
            .order_by("-start_check")
            .values("start_check")[:1]
        )
        monitor_ids = (
            Monitor.objects.filter(organization__is_accepting_events=True)
            .annotate(
                last_min_check=ExpressionWrapper(
                    now - F("interval"), output_field=DateTimeField()
                ),
                latest_check=latest_check,
            )
            .filter(latest_check__lte=F("last_min_check"))
            .values_list("id", flat=True)
        )
        batch_size = 1000
        batch_ids = []
        for i, monitor_id in enumerate(monitor_ids.iterator(), 1):
            batch_ids.append(monitor_id)
            if i % batch_size == 0:
                perform_checks.delay(batch_ids, now)
                batch_ids = []
        if len(batch_ids) > 0:
            perform_checks.delay(batch_ids, now)
    
    @shared_task
    def perform_checks(monitor_ids: List[int], now=None):
        if now is None:
            now = timezone.now()
        # Convert queryset to raw list[dict] for asyncio operations
        monitors = list(Monitor.objects.filter(pk__in=monitor_ids).values())
        loop = asyncio.get_event_loop()
        results = loop.run_until_complete(fetch_all(monitors, loop))
        MonitorCheck.objects.bulk_create(
            [
                MonitorCheck(
                    monitor_id=result["id"],
                    is_up=result["is_up"],
                    start_check=now,
                    reason=result.get("reason", None),
                    response_time=result.get("response_time", None),
                )
                for result in results
            ]
        )
    

    The fancy Django ORM subquery is to ensure we are able to determine which monitors need checked while being as performant as possible. While some may prefer complex queries in raw SQL, for some reason I prefer ORM and I’m impressed to see how many use cases Django can cover these days. Anything to avoid writing lots of join table SQL 🤣️

    aiohttp code

    async def process_response(monitor, response):
        if response.status == monitor["expected_status"]:
            if monitor["expected_body"]:
                if monitor["expected_body"] in await response.text():
                    monitor["is_up"] = True
                else:
                    monitor["reason"] = MonitorCheckReason.BODY
            else:
                monitor["is_up"] = True
        else:
            monitor["reason"] = MonitorCheckReason.STATUS
    
    async def fetch(session, monitor):
        url = monitor["url"]
        monitor["is_up"] = False
        start = time.monotonic()
        try:
            if monitor["monitor_type"] == MonitorType.PING:
                async with session.head(url, timeout=PING_AIOHTTP_TIMEOUT):
                    monitor["is_up"] = True
            elif monitor["monitor_type"] == MonitorType.GET:
                async with session.get(url, timeout=DEFAULT_AIOHTTP_TIMEOUT) as response:
                    await process_response(monitor, response)
            elif monitor["monitor_type"] == MonitorType.POST:
                async with session.post(url, timeout=DEFAULT_AIOHTTP_TIMEOUT) as response:
                    await process_response(monitor, response)
            monitor["response_time"] = timedelta(seconds=time.monotonic() - start)
        except SSLError:
            monitor["reason"] = MonitorCheckReason.SSL
        except asyncio.TimeoutError:
            monitor["reason"] = MonitorCheckReason.TIMEOUT
        except OSError:
            monitor["reason"] = MonitorCheckReason.UNKNOWN
        return monitor
    
    async def fetch_all(monitors, loop):
        async with aiohttp.ClientSession(loop=loop) as session:
            results = await asyncio.gather(
                *[fetch(session, monitor) for monitor in monitors], return_exceptions=True
            )
            return results

    That’s it. Ignoring my models and plenty of Django boilerplate, we have the core of a reasonably performant uptime monitoring system in about 120 lines of code. GlitchTip is MIT licensed so feel free to use as you see fit. I also run a small SaaS service at app.glitchtip.com which helps fund development.

    On testing

    I greatly prefer testing in Python over JavaScript. I’m pretty sure this 15 line integration test would require a pretty complex Jasmine boilerplate and run about infinite times slower in CI. I will gladly put up with some asyncio boilerplate to avoid testing anything in JavaScript. In my experience, there are Python test driven development fans and there are JS developers who intended to write tests.

        @aioresponses()
        def test_monitor_checks_integration(self, mocked):
            test_url = "https://example.com"
            mocked.get(test_url, status=200)
            with freeze_time("2020-01-01"):
                mon = baker.make(Monitor, url=test_url, monitor_type=MonitorType.GET)
            self.assertEqual(mon.checks.count(), 1)
    
            mocked.get(test_url, status=200)
            with freeze_time("2020-01-01"):
                dispatch_checks()
            self.assertEqual(mon.checks.count(), 1)
    
            with freeze_time("2020-01-02"):
                dispatch_checks()
            self.assertEqual(mon.checks.count(), 2)

    There’s a lot going on in little code. I use aioresponses to mock network requests. Django baker to quickly generate DB test data. freezegun to simulate time changes. assertEqual from Django’s TestClient. And not seen, CELERY_ALWAYS_EAGER in settings.py to force celery to run synchronously for convenience. I didn’t write any async tests code yet I have a pretty decent test covering the core functionality from having monitors in the DB to ensuring they were checked properly.

    JS equivalent

    describe("test uptime", function() {
      it("should work", function() {
        // TODO
      });
    });

    Joking aside, I find it quite hard to find a good Node based task runner like Celery, ORM, and test framework that really work well together. There are many little niceties like running Celery in always eager mode that make testing a joy in Python. Let me know in a comment if you disagree and have any JavaScript based solutions you like.

  • Deploy Saleor E-commerce with Kubernetes and Helm

    Saleor is a headless, Django based e-commerce framework. This post will show how to deploy Saleor using Django Helm Chart. It will focus on deploying the Django Backend. The dashboard is a static HTML site and is left out. The front-end is something you should build yourself.

    First you need a Docker image. You can build this yourself or use https://hub.docker.com/r/mirumee/saleor/. I suggest building it yourself so that it’s possible to add plugins and set the specific version you’d like. Here’s a snippet for Gitlab CI as a starting point. This can be run on a fork of Saleor which already contains a Dockerfile. I like to tag my image with both the git ref name and short sha for reference later on.

    build:
      stage: build 
      image: docker:20
      services:
        - docker:20-dind
      script:
        - docker login -u gitlab-ci-token -p $CI_JOB_TOKEN registry.gitlab.com
        - docker build -t $CI_REGISTRY_IMAGE:$CI_COMMIT_REF_NAME -t $CI_REGISTRY_IMAGE:$CI_COMMIT_SHORT_SHA .
        - docker push $CI_REGISTRY_IMAGE:$CI_COMMIT_REF_NAME
        - docker push $CI_REGISTRY_IMAGE:$CI_COMMIT_SHORT_SHA

    Next, create a values.yml file to power Django Helm Chart. Here’s an example:

    image:
      repository: your-docker-image
      tag: latest
    
    env:
      normal:
        ALLOWED_CLIENT_HOSTS: localhost,127.0.0.1,your-frontend-url
        ALLOWED_HOSTS: "*"
        ENABLE_SSL: "True"
        DEFAULT_EMAIL_FROM: noreply@example.com
        AWS_ACCESS_KEY_ID: XXXXXXXXXX
        AWS_MEDIA_BUCKET_NAME: bucket-name
        AWS_DEFAULT_ACL: public-read
        SENTRY_DSN: https://something@app.glitchtip.com/project-id
      secret:
        DATABASE_URL: your-postgres-connection-string
        SECRET_KEY: your-secret-key
        AWS_SECRET_ACCESS_KEY: XXXXXXXXX
        EMAIL_URL: email-connection-string
        CELERY_BROKER_URL: your-redis-connection-string
    
    web:
      replicaCount: 2
      port: 8000
      args: ["gunicorn", "--bind", ":8000", "--workers", "4", "--worker-class", "uvicorn.workers.UvicornWorker", "saleor.asgi:application"]
      autoscaling:
        enabled: false
      livenessProbe:
        failureThreshold: 5
        initialDelaySeconds: 5
        timeoutSeconds: 2
        path: "/graphql/"
      readinessProbe:
        failureThreshold: 10
        initialDelaySeconds: 5
        timeoutSeconds: 2
        path: "/graphql/"
      ingress:
        enabled: true
        annotations:
          kubernetes.io/ingress.class: nginx
        hosts:
          - host: your-host
            paths:
              - path: /
                pathType: ImplementationSpecific
    
    worker:
      enabled: true
      args:
        - celery
        - -A
        - saleor
        - --app=saleor.celeryconf:app
        - worker
        - --loglevel=info
    
    redis:
      architecture: standalone
      auth:
        password: redis-password
      master:
        persistence:
          enabled: false
    

    Let’s break this apart, as there are many options here.

    • I choose to enable Kubernetes managed Redis but not Postgres. I don’t trust running stateful services like Postgres in Kubernetes but you could set postgres.enabled=true.
    • Many Saleor settings are managed via environment variables. Documentation for them exists here. In the example, I configure AWS S3 and set my DATABASE_URL to a managed Postgres instance like RDS.
    • The web and worker args (which maps to Docker’s command) are set to the specific run commands for Saleor which uses celery and gunicorn. This is also the place to edit configuration options, such as number of gunicorn workers.
    • The example contains a ingress. Don’t forget to add a ingress controller like ingress-nginx to your cluster. If you don’t need a internet accessible URL, remove it.

    Next add the chart repo (or fork it).

    helm repo add django https://burke-software.gitlab.io/django-helm-chart/
    helm install your-app django/django -f values.yml

    The chart should output instructions on accessing the new site. Make sure to review logs to ensure Celery is running as well. Now you have a Saleor backend running on Kubernetes. If running in production, make sure to review affinity values, Saleor configuration, resource limits, and add tls to the ingress.

  • Deploy Django with Helm

    This is a follow up post to Deploy Django with helm to Kubernetes which focused on the CI pipeline. This post will highlight a generic Django Helm Chart I made for GlitchTip, an open source alternative to Sentry issue tracking.

    Note that Kubernetes and Helm are very complex systems that a simple Django app does not need. GlitchTip, for example, can run on DigitalOcean App Platform.

    Django + Celery + Redis Helm Chart

    Django Helm Chart can act as a starter Helm Chart for any Django project. While you could use the chart directly, I recommend forking it instead so that you can include your own customizations.

    Let’s start with some language definitions and assumptions

    • A django app is made of several “components” – often the web server, Celery worker queue, Celery Beat, DB migration job, and databases including Postgres and Redis.
    • In addition, we need Helm specific infrastructure such as a Service, Load Balancer, and/or Ingress.
    • Environment variables will be stored as Helm values. This is a method that can easily be done with Helm alone. You may want a more complex solution for secrets such as Hashicorp Vault.
    • I highly recommend installing Helm Diff. I wouldn’t suggest using Helm without it. One small typo in Helm can delete your entire app.
    • This chart supports Helm based Postgres and Redis, however I strongly recommend using a managed service for any persistent data.

    Forking the Helm Chart

    Start by forking the Django Helm Chart. If you’d like to keep your own secrets in a values.yaml file – ensure this repo is private.

    • Edit Chart.yaml and set the name to your project. You may want to edit appVersion, but I find it a little burdensome to increment this. Unless you plan to host a helm chart for many users, it’s not necessary.
    • Carefully review values.yaml
      • Notice the tree structure reflects our web and worker components.
      • For new kubernetes users, leave autoscaling off and set replicas manually.
      • Defaults for resources are a guess. Adjust them based on your app’s real world usage.
      • The default web affinity attempts to implement the business rule “Do not run all app pods on the same node”
        • This will only work if you have at least one more node than you need. If one node becomes unhealthy, Kubernetes may be forced to do “bad” things like schedule all pods on one Node. I recommend at least three Nodes for even a smaller production deployment.
      • If your app needs to live on the internet, enable the Ingress. You’ll also need one Load Balancer for your Kubernetes cluster. Technically you can make just a Load Balancer and ignore the Ingress, but I don’t recommend this. Most service providers charge for Load Balancers and it may get expensive running them for staging/testing instances of your app.
      • Consider if you need to enable Postgres and Redis. Personally, I always use a managed, non-kubernetes, Postgres server like RDS or DigitalOcean’s managed databases. If my Redis instance doesn’t need to persist, for example it’s used only for cache or a task queue, I enable it in Kubernetes.
      • Any key-value under environmentVariables will map to environment variables that can be read manually or by django-environ.

    Health checks assume a endpoint at /_health/. I suggest adding this to your Django admin, although you could change it in templates/web/deployment.yaml. It isn’t desired to run, for example, your homepage if it involves database lookups. Don’t test your entire app infrastructure, only test that Django is responding.

    def health(request):
        return HttpResponse("ok", content_type="text/plain")
    
    path("_health/", health),
    

    Now install your app. Something like

    helm install your-chart -f your-values.yaml

    What’s next?

    Consider contributing any improvements. Here’s a few ideas:

    • Better budget, affinity, autoscaling, and resource defaults.
    • Ideas for secrets management.
    • Enable/Disable features like Celery and more. Done
    • Is it worth publishing this chart instead of only forking it?

    If you found this chart useful, consider donating time or money to GlitchTip. Donations let me spend more time on various open source projects. GlitchTip is an open source error tracking platform that is compatible with the open source Sentry SDKs. It’s a free software alternative to proprietary platforms like DataDog and Sentry. We also offer a paid hosted service.

  • Wagtail Single Page App Integration news

    wagtail-spa-integration is a Python package I started with coworkers at thelab.

    Version 2.0

    Wagtail SPA Integration 2.0 is released! The release is actually maintenance only, but now requires Wagtail 1.8+ thus making it a potentially breaking change.

    Coming soon version 3.0 with wagtail-headless-preview

    A major feature of Wagtail SPA Integration is preview support. Torchbox (the creators of Wagtail) developed their own solution called wagtail-headless-preview. We’ll be migrating to this and it will be a significant breaking change. Aligning with Torchbox’s implementation will reduce our maintenance burden and allow for a generally more “normal” experience. It will also remove a feature/quirk in Wagtail SPA that generated links that could be used for up to one day without authentication.

    NextJS Support coming soon!

    We have a proof of concept for NextJS support. Preview/contribute it here. This package utilizes NextJS’s dynamic routing and dynamic components making it possible base NextJS pages on Wagtail page types. One difference from the Angular Wagtail implementation is that all communication is handled via the NextJS Node server instead of direct Wagtail REST API calls. This results in simpler code, but slightly worse performance.

    Angular Wagtail will also receive a minor update to work with 3.0.

    Shameless advertising

    Looking for an open source error monitoring solution for your Django, Angular, or NextJS apps? Try out glitchtip.com. GlitchTip is compatible with Sentry’s open source SDK but unlike Sentry is 100% open source. We offer paid SaaS hosting as an option. Your support gives us time to continue work on these various open source projects!

  • Deploy Django with helm to Kubernetes

    This guide attempts to document how to deploy a Django application with Kubernetes while using continuous integration It assumes basic knowledge of Docker and running Kubernetes and will instead focus on using helm with CI. Goals:

    • Must be entirely automated and deploy on git pushes
    • Must run database migrations once and only once per deploy
      • Must revert deployment if migrations fail
    • Must allow easy management of secrets via environment variables

    My need for this is to deploy GlitchTip staging builds automatically. GlitchTip is an open source error tracking platform that is compatible with Sentry. You can find the finished helm chart and gitlab CI script here. I’m using DigitalOcean and Gitlab CI but this guide will generally work for any Kubernetes provider or Docker based CI tool.

    Building Docker

    This guide assumes you have basic familiarity with running Django in Docker. If not, consider a local build first using docker compose. I prefer using compose for local development because it’s very simple and easy to install.

    Build a Docker image and tag it with the git short hash. This will allow us to specify an exact image build later on and will ensure code builds are tied to specific helm deployments. If we used “latest” instead, we may end up accidentally upgrading the Docker image. Using Gitlab CI the script may look like this:

    docker build -t ${CI_REGISTRY_IMAGE}:${CI_COMMIT_REF_NAME} -t ${CI_REGISTRY_IMAGE}:${CI_COMMIT_SHORT_SHA}

    This uses -t to tag the new build with the Gitlab CI environment variables to specify the docker registry and tags. It uses “ref name” which is the tag or branch name. This will result in a tag such as “1.3” or branch such as “dev”. This tagging is intended for users who may just want a specific named version or branch. The second -t tags it with the git short hash. This tag will be referenced later on by helm.

    Before moving on – make sure you can now docker pull your CI built image and run it. Make sure to set the Dockerfile CMD to use gunicorn, uwsgi, or another production ready server. We’ll deal with Django migrations later using Helm.

    Setting up Kubernetes

    This guide assumes you know how to set up Kubernetes. I chose DigitalOcean because they provide managed Kubernetes, it’s reasonably priced, and I like supporting smaller companies. DigitalOcean limits choice which makes it easier to use for average looking projects. It doesn’t offer the level of customization and services AWS does. If you decide to use DigitalOcean and want to help offset the cost of my open source projects, considering using this affiliate link. My goals for a hosting platform are:

    • Easy to use
    • Able to be managed via terraform
    • Managed Postgres
    • Managed Kubernetes
    • Able to restrict network access for internal services such as the database

    Whichever platform you are using, make sure you have a database and it’s connection string and can authenticate to Kubernetes. If you are new to Kubernetes, I suggest deploying any docker image manually (without tooling like helm) to get a little more familiar. Technically, you could also run your database in Kubernetes and Helm. However I prefer managed stateful services and will not cover running the database in Kubernetes in this guide.

    Deploy to Kubernetes with Helm in Gitlab CI

    Update Feb 2021
    The GlitchTip Helm Chart is now a generic Django + Celery Helm chart. Read more here.


    Now that you have a Docker image and Kubernetes infrastructure, it’s time to write a Helm chart and deploy your image automatically from CI. A Helm chart allows you to write Kubernetes yaml configuration templates using variables. The chart I use for GlitchTip should be a good starting point for most Django apps. At a minimum, read the getting started section for Helm’s documentation. The GlitchTip chart includes one web server deployment and a Django migration job with helm lifecycle hook. You may need to set up an additional deployment if you use a worker such as Celery. The steps are the same, just override the Docker RUN command to start celery instead of your web server.

    Run the initial helm install locally. This is necessary to set initial variables such as the database connection that don’t need to be set in CI each deploy. Reference each value to override in your chart’s values.yaml. If following my GlitchTip example, that will be databaseURL and secretKey. databaseURL is the Database connection string. I use django-environ to set this. You could also define a separate databaseUser, databasePassword, etc if you like making more work for yourself. The key to make this work is to ensure one way or another the database credentials and other configuration get passed in as environment variables that are read by your settings.py file. Ensure your CI server has built at least one docker image. Place your chart files in the same git repo as your Django project in a directory “chart”

    Run helm install your-app-name ./chart --set databaseURL=string --set secretKey=random_string --set image.tag=git_short_hash

    If you use GlitchTip’s chart – it will not set up a load balancer but it will show output that explains how to connect locally just to test that everything is working. The Django migration job should also run and migrate your database. This guide will not include the many options you have for load balancing. I choose to use DigitalOcean’s load balancer and having it directly select the deployment’s pods. Note that in Kubernetes, a service of type Load Balancer may run a service providers load balancer and allow you to configure it through kubernetes config yaml. This will vary between providers. Here’s a sample load balancer that can be applied with ​kubectl –namespace your-namespace apply -f load-balancer.yaml note that it uses selector to directly send traffic from the load balancer to pods. It also contains DigitalOcean specific annotations, which is why I can’t document a universal way to do this.

    apiVersion: v1
    kind: Service
    metadata:
      name: your-app-staging
      annotations:
        service.beta.kubernetes.io/do-loadbalancer-certificate-id: long-id
        service.beta.kubernetes.io/do-loadbalancer-healthcheck-path: /
        service.beta.kubernetes.io/do-loadbalancer-protocol: http
        service.beta.kubernetes.io/do-loadbalancer-redirect-http-to-https: "true"
        service.beta.kubernetes.io/do-loadbalancer-tls-ports: "443"
    spec:
      type: LoadBalancer
      ports:
      - name: http
        port: 80
        protocol: TCP
        targetPort: 8080
      - name: https
        port: 443
        protocol: TCP
        targetPort: 8080
      selector:
        app.kubernetes.io/instance: your-app-staging
        app.kubernetes.io/name: your-app


    At this point you should have a fully working Django application.

    Updating in CI using Helm

    Now set up CI to upgrade your app on git pushes (or other criteria). While technically optional, I suggest making separate namespaces and service accounts for each environment. Unfortunately this process can feel obtuse at first and I felt was the hardest part of this project. For each environment, we need the following:

    • Service Account
    • Role Binding
    • Secret with CA Cert and token

    For a rough analogy the service account is a “user” but for a bot instead of a human. A role binding defines the permissions that something (say a service account) has. The role binding should have the “edit” permission for the namespace. The secret is like the “password” but is actually a certificate and token. Read more from Kubernetes documentation.

    Once this is set up locally, test it out. For example, use the new service account auth in your ~/.kube/config and run kubectrl get pods –namespace=your-namespace. The CA cert and token from your recently created secret should be what is in your kube’s config file. I found no sane manner of editing multiple kubernetes configurations and resorted to manually editing the config file.

    apiVersion: v1
    clusters:
    - cluster:
        certificate-authority-data: big-long-base64 
        server: https://stuff.k8s.ondigitalocean.com
      name: some-name
    
    ...
    
    users:
    - name: default
      user:
        token big-long-token-from-secret

    Notice I used certifate-authority-data so I could reference the cert inline as base64. Next save the entire config file in Gitlab CI under settings, CI, Variables.

    Screenshot from 2020-01-24 10-59-53

    There’s actually a lot happening in this little bit of configuration. File type in Gitlab CI will cause the value to save into a random tmp file. The key “KUBECONFIG” will be set to the file location. KUBECONFIG is also the environment variable helm will use to locate the kube config file. Protected will allow this only to be available to protected git branches/tags. If we didn’t set protected, someone with only limited git access could make their own branch that runs echo $KUBECONFIG and view the very confidential data! If set up right, you should now be able to run helm with the authentication that just works.

    Finally add the deploy step to Gitlab CI’s yaml file.

    deploy-staging:
      stage: deploy
      image: lwolf/helm-kubectl-docker
      script:
        - helm upgrade your-app-staging ./chart --set image.tag=${CI_COMMIT_SHORT_SHA} --reuse-values
      environment:
        name: staging
        url: https://staging.example.com
      only:
        - master
    

    ​stage ensures it runs after the docker build. For image, use lwolf/helm-kubectl-docker which has helm already installed. The script is amazingly just one line thanks to the previous authentication and Gitlab CI variable tricks done. It runs helm upgrade with –set image.tag to the new git short hash and –reuse-values allows it to set this new value without overriding previous values. Using helm this way allows you to keep database secrets outside of Gitlab. Do note however that anyone with helm access can read these values. If you need a more robust system then you’ll need something like Vault. But even without Vault, we can isolate basic git users who can create branches and admin users who have access to helm and the master branch.

    The environment section is optional and let’s Gitlab track deploys. “only” causes the script to only run on the master branch. Alternatively it could be set for other branches or tags.

    If you need to change an environment variable, run the same upgrade command locally and –set as many variables as needed. Keep the –reuse-values. Because the databaseURL value is marked as required, helm will error instead of erase previous values should you forget the important –reuse-values.

    Conclusion

    I like Kubernetes for it’s reliability but I find it creates a large amount of decision fatigue. I hope this guide provides one way to do things that I find works. If you have a better way – let me know by commenting here or even open an issue on GlitchTip. I’m sure there’s room for improvement. For example, I’d rather generate the django secret key automatically but helm’s random function doesn’t let you store it persistently.

    I don’t like Kube’s, maddening at times, complexity. Kubernetes is almost never a solution by itself and requires additional tools to make it work for even very basic use cases. I found Openshift to handle a lot of common use cases like deploy hooks and user/service management much easier. Openshift “routes” are also defined in standard yaml config rather than forcing the user to deal with propreitary annotations on a Load Balancer. However, I’m leery of using Openshift Online considering it hasn’t been updated to version 4 and no roadmap seems to exist. It’s also quite a bit more expensive (not that it’s bad to pay more for good open source software).

    Finally if you need error tracking for your Django app and prefer open source solutions – give GlitchTip a try. Contributors are preferred, but you can also support the project by using the DigitalOcean affiliate link or donating. Burke Software also offers paid consulting services for open source software hosting and software development.

  • Django Rest Framework ModelViewSets with natural key lookup

    DRF ModelViewSet can easily support detail views by slug via the lookup_value attribute. But what if you had compound keys (aka natural keys)? For example a url structure like

    /api/computers/<organization-slug>/<computer-slug>/

    A computer slug may only be unique per organization. That means different organizations may have computers with the same slug. But no computer may have the same slug in one organization. By using both slugs, we can look up a specific computer. We can use the lookup_value_regex attribute for this.

    class ComputerViewSet(viewsets.ModelViewSet):
        queryset = Computer.objects.all()
        serializer_class = ComputerSerializer
        lookup_value_regex = r"(?P<org_slug>[^/.]+)/(?P<slug>[-\w]+)"
    
        def get_object(self):
            queryset = self.filter_queryset(self.get_queryset())
            obj = get_object_or_404(
                queryset,
                slug=self.kwargs["slug"],
                organization__slug=self.kwargs["org_slug"],
            )
    
            # May raise a permission denied
            self.check_object_permissions(self.request, obj)
    
            return obj


    This works with drf-nested-routers. For example, we could add a nested /hard_drives viewset. The url values are in self.kwargs.

    class HardDriveViewSet(viewsets.ModelViewSet):
        queryset = HardDrive.objects.all()
        serializer_class = HardDriveSerializer
    
        def get_queryset(self):
            return (
                super()
                .get_queryset()
                .filter(
                    computer__slug=self.kwargs["slug"],
                    computer__organization__slug=self.kwargs["org_slug"],
                )
            )
  • Angular Wagtail 1.0 and getting started

    Angular Wagtail and Wagtail Single Page App Integration are officially 1.0 and stable. It’s time for a more complete getting started guide. Let’s build a new app together. Our goal will be to make a multi-site enabled Wagtail CMS with a separate Angular front-end.  When done, we’ll be set up for features such as

    • Map Angular components to Wagtail page types to build any website tree we want from the CMS
    • All the typical wagtail features we expect, drafts, redirects, etc. No compromises.
    • SEO best practices including server side rendering with Angular Universal, canonical urls, and meta tags.
    • Correct status codes for redirects and 404 not found
    • Lazy loaded modules
    • High performance, cache friendly, small JS bundle size (In my experience 100kb – 270kb gzipped for large scale apps)
    • Absolutely no jank. None. When a page loads we get the full page. Nothing “pops in” unless we want it to. No needless dom redraws that you may see with some single page apps.
    • Scalable – add more sites, add translations, keep just one “headless” Wagtail instance to manage it all.

    Start with a Wagtail project that has wagtail-spa-integration added. For demonstration purposes, I will use the sandbox project in wagtail-spa-integration with Docker. Feel free to use your own Wagtail app instead.

    1. git clone https://gitlab.com/thelabnyc/wagtail-spa-integration.git
    2. Install docker and docker-compose
    3. docker-compose up
    4. docker-compose run –rm web ./manage.py migrate
    5. docker-compose run –rm web ./manage.py createsuperuser
    6. Go to http://localhost:8000/admin/ and log in.

    Set up Wagtail Sites. We will make 1 root page and multiple homepages representing each site.
    Screenshot from 2019-10-20 12-08-46

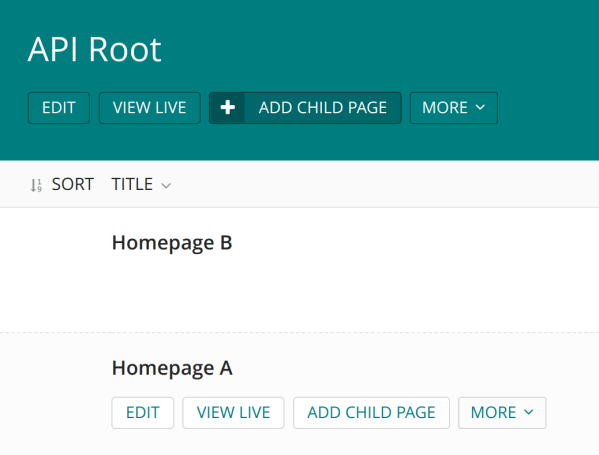
    You may want to rename the “Welcome to Wagtail” default page to “API Root” just for clarity. Then create two child pages of any type to act as homepages. If you don’t need multi-site support, just add one instead. Wagtail requires the Sites app to be enabled even if only one site is present. The API Root will still be important later on for distinguishing the Django API server from the front-end Node server.

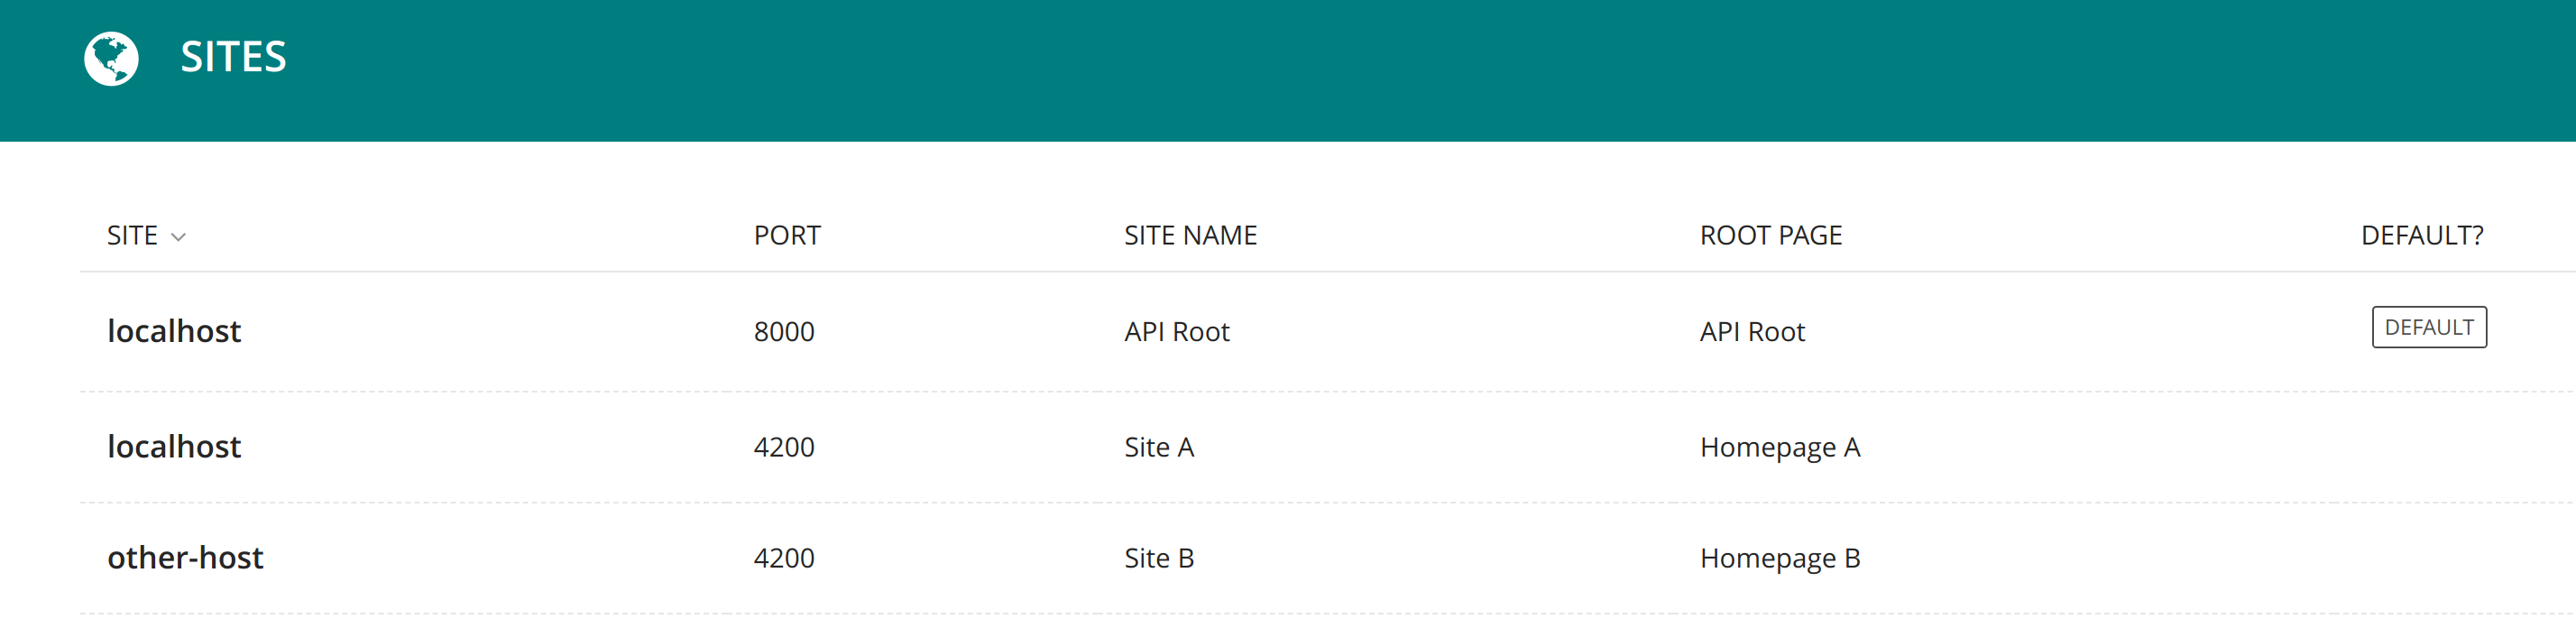
    Next head over to Settings, Sites. Keep the default Site attached to the API Root page. Add another Site for each homepage. If you intend to have two websites, you should have three Wagtail Sites (API Root, Site A, Site B). Each hostname + port combination must be unique. For local development, it doesn’t matter much. For production you may have something like api.example.com, http://www.example.com, and intranet.example.com.

    Screenshot from 2019-10-20 15-13-39

    Next let’s set up the Wagtail API. This is already done for you in the sandbox project but when integrating your own app, you may follow the docs here. Then follow Wagtail SPA Integration docs to set up the extended Pages API. Make sure to set WAGTAILAPI_BASE_URL to localhost:8000 if you want to run the site locally on port 8000. Here’s an example of setting up routes.

    api.py

    from wagtail.api.v2.router import WagtailAPIRouter
    from wagtail_spa_integration.views import SPAExtendedPagesAPIEndpoint
    
    api_router = WagtailAPIRouter('wagtailapi')
    api_router.register_endpoint('pages', SPAExtendedPagesAPIEndpoint)

    urls.py

    from django.conf.urls import include, url
    from wagtail.core import urls as wagtail_urls
    from wagtail_spa_integration.views import RedirectViewSet
    from rest_framework.routers import DefaultRouter
    from .api import api_router
    
    router = DefaultRouter()
    router.register(r'redirects', RedirectViewSet, basename='redirects')
    
    urlpatterns = [
        url(r'^api/v2/', api_router.urls),

    Test this out by going to localhost:8000/api/ and localhost:8000/api/v2/pages/

    If you’d like to enable the Wagtail draft feature – set PREVIEW_DRAFT_CODE in settings.py to any random string. Note this feature will generate special one time, expiring links that do not require authentication to view drafts. This is great for sharing and the codes expire in one day. However if your drafts contain more sensitive data, you may want to add authentication to the Pages API. This is out of scope for Wagtail SPA Integration, but consider using any standard Django Rest Framework authentication such as tokens or JWT. You may want to check if a draft code is present and only check authentication then, so that the normal pages API is public.

    Angular Front-end

    Now let’s add a new Angular app (or modify an existing one).

    1. ng new angular-wagtail-demo
    2. cd angular-wagtail-demo
    3. npm i angular-wagtail –save

    In app.module.ts add

    import { WagtailModule } from 'angular-wagtail';
    WagtailModule.forRoot({
      pageTypes: [],
      wagtailSiteDomain: 'http://localhost:8000',
      wagtailSiteId: 2,
    }),

    In app-routing.module.ts add

    import { CMSLoaderGuard, CMSLoaderComponent } from 'angular-wagtail';
    const routes: Routes = [{ path: '**', component: CMSLoaderComponent, canActivate: [CMSLoaderGuard] }];

    This is the minimal configuration. Notice the domain and site ID are set explicitly. This is not required as Wagtail can determine the appropriate site based on domain. However, it’s much easier to set it explicitly so that we don’t have to set up multiple hostnames for local development. Next let’s add a lazy loaded homepage module. Making even the homepage lazy loaded will get us in the habit of making everything a lazy loaded module which improves performance for users who might not visit the homepage first (Such as an ad or search result to a specific page).

    ng generate module home --routing
    ng generate component home

    In app.module.ts add a “page type”. An Angular Wagtail page type is a link between Wagtail Page Types and Angular components. If we make a Wagtail page type “cms_django_app.HomePage” we can link it to an Angular component “HomeComponent”. Page types closely follow the Angular Router, so any router features like resolvers will just work with exactly the same syntax. In fact, angular-wagtail uses the Angular router behind the scenes.

    pageTypes: [
      {
        type: 'sandbox.BarPage',
        loadChildren: () => import('./home/home.module').then(m => m.HomeModule)
      },
    ]

    This maps sandbox.BarPage from the wagtail-spa-integration sandbox to the HomeModule. “sandbox” is the django app name while BarPage is the model name. This is the same syntax as seen in the Wagtail Pages API and many other places in django to refer to a model (app_label.model). “loadChildren” is the same syntax as the Angular Router. I could set the component instead of loadChildren if I didn’t want lazy loading.

    Next edit home/home-routing.module.ts. Since our homepage has only one component, set it to always load that component

    home-routing.module.ts with WagtailModule.forFeature

    const routes: Routes = [{
      path: '',
      component: HomeComponent
    }];

    To test everything is working run ​”npm start” and go to localhost:4200.

    Screenshot from 2019-10-20 14-47-23

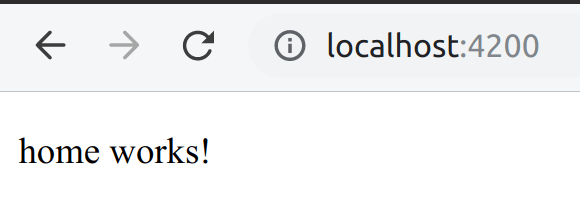
    We now have a home page! However, it doesn’t contain any actual CMS data. Let’s start by adding the page’s title. We could get this data on ngOnInit however this would load the data asynchronously after the route is loaded. This can lead to jank because any static content would load immediately on route completion but async data would pop in later. To fix this, we’ll use a resolver. Resolvers can get async data before the route completes.

    Edit home-routing.module.ts

    import { GetPageDataResolverService } from 'angular-wagtail';
    const routes: Routes = [{
      path: '',
      component: HomeComponent,
      resolve: { cmsData: GetPageDataResolverService }
    }];

    This resolver service will assign an Observable with the CMS data for use in the component. We can use it in our component:

    home.component.ts

    import { ActivatedRoute } from '@angular/router';
    import { Observable } from 'rxjs';
    import { map } from 'rxjs/operators';
    import { IWagtailPageDetail } from 'angular-wagtail';
    
    interface IHomeDetails extends IWagtailPageDetail {
      extra_field: string;
    }
    
    @Component({
      selector: 'app-home',
      template: `
        <p>Home Works!</p>
        <p>{{ (cmsData$ | async).title }}</p>
      `,
    })
    export class HomeComponent implements OnInit {
      public cmsData$: Observable<IHomeDetails>;
    
      constructor(private route: ActivatedRoute) { }
    
      ngOnInit() {
        this.cmsData$ = this.route.data.pipe(map(dat => dat.cmsData));
      }
    }

    Going top to bottom, notice how IHomeDetails extends IWagtailPageDetail and adds page specific fields. This should mimic the fields you added when defining the Wagtail Page model. Default Wagtail fields like “title” are included in IWagtailPageDetail.

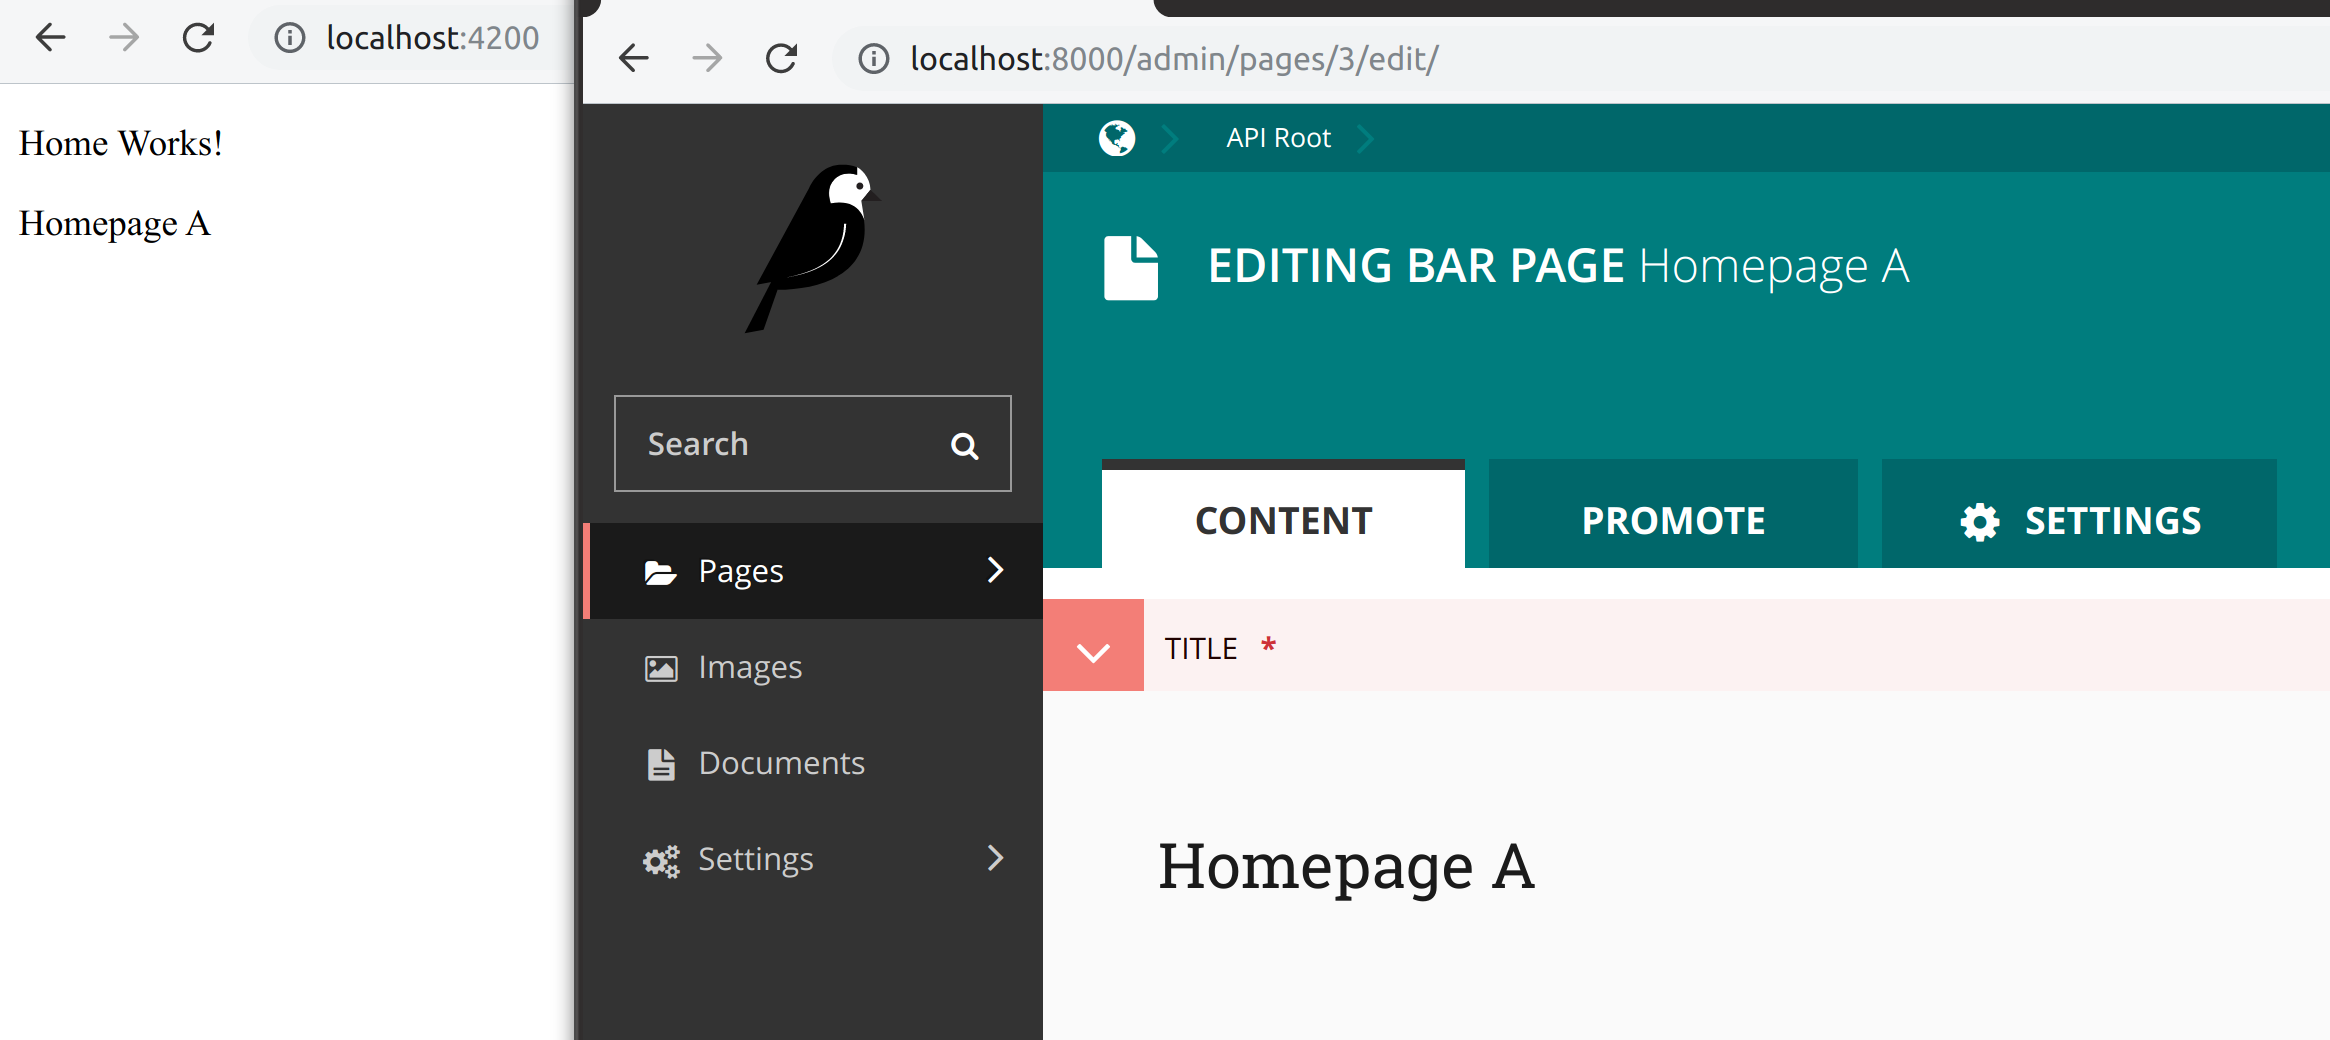
    The template references the variable cmsData$ which is an Observable with all page data as given by the Wagtail Pages API detail view.

    ngOnInit is where we set this variable, using route.data. Notice how cmsData is available from the resolver service. When you load the page, you should notice “Home Works!” and the title you set in the CMS load at the same time. Nothing “pops in” which can look bad.

    Screenshot from 2019-10-20 15-15-59.png

    At this point, you have learned the basics of using Angular Wagtail!

    Adding a lazy loaded module with multiple routes

    Sometimes it’s preferable to have one module with multiple components. For example, there may be 5 components and two of them represent route-able pages. Keeping them grouped in a module increases code readability and makes sense to lazy load the components together. To enable this, make use of WagtailModule.forFeature. Let’s try making a “FooModule” example to demonstrate.

    ng generate module foo
    ng generate component foo

    Edit foo.module.ts

    import { NgModule, ComponentFactoryResolver } from '@angular/core';
    import { CommonModule } from '@angular/common';
    import { WagtailModule, CoalescingComponentFactoryResolver } from 'angular-wagtail';
    import { FooComponent } from './foo.component';
    
    @NgModule({
      declarations: [FooComponent],
      entryComponents: [FooComponent],
      imports: [
        CommonModule,
        WagtailModule.forFeature([
          {
            type: 'sandbox.FooPage',
            component: FooComponent
          }
        ])
      ]
    })
    
    export class FooModule {
      constructor(
        coalescingResolver: CoalescingComponentFactoryResolver,
        localResolver: ComponentFactoryResolver
      ) {
        coalescingResolver.registerResolver(localResolver);
      }
    }

    FooComponent is added to both declarations and entryComponents as it’s not directly added to the router. WagtailModule.forFeature will link the wagtail page type with a component. You can also add a resolver here if needed. Lastly, the constructor adds coalescingResolver. This enabled dynamic component routing between modules and likely won’t be needed in Angular 9 with Ivy and future versions of Angular Wagtail.

    Add as many types of page types as desired.

    Angular Universal

    Angular Universal can generate pages in Node (or prerender them). This is nice for SEO and general performance. The effect is to generate a minimalist static view of the page that runs without JS enabled. Later the JS bundle is loaded and any dynamic content (shopping carts, user account info) is loaded in. Because the server side rendered static page is always the same for all users, it works great with a CDN. I’ve found even complex pages will be around 50kb of data for the first dom paint. Installation is easy.

    ng add @nguniversal/express-engine --clientProject angular.io-example

    Compile with npm run build:ssrand serve with npm run serve:ssr​. Angular Wagtail supports a few environment variables we can set in node. Setting the API server domain and site per deployment is possible:

    export WAGTAIL_SITE_ID=2
    export CMS_DOMAIN=http://localhost:8000

    Confirm it’s working by disabling JavaScript in your browser.

    Angular Wagtail provides a few extras for Angular Universal when run in Node (serve:ssr). You can return 404, 302, and 301 status codes by editing server.ts as documented. You can also add the wagtail generated sitemap. Not directly related to Wagtail, but I found helmet and adding a robots.txt pretty helpful too. Angular Univeral just runs express, so anything possible in express is possible in Angular Universal.

    Bells and whistles – not found and more SEO

    For a real site, consider adding a 404 not found component, setting page meta tags and canonical url. Edit the WagtailModule.forRoot configuration to modify this however you wish. If you followed the server set up from above then Wagtail redirects and drafts should “just work”. Any time Angular Wagtail can’t match a url path to component, it will query the Wagtail SPA Integration redirects API and will redirect if it finds one. If not, Angular Wagtail will show the 404 not found component to the user.

    You can find the full angular wagtail demo source on gitlab.

  • Talk: Integrating Angular with “Headless” Wagtail CMS

    I gave a talk at the Django NYC meetup. Here is a link.

    I spoke about Wagtail SPA Integration and Angular Wagtail. I am hoping to call both projects 1.0 in September. Please give them and test and report bugs!


  • Controlling a ceiling fan with Simple Fan Control

    I released Simple Fan Control today on Google Play, web, and source on Gitlab. This project’s genesis was the purchase of a Hunter Advocate fan with Internet connectivity. It’s app doesn’t work, which I wrote about recently.

    Screenshot from 2019-06-30 11-41-05
    Simple Fan Control’s web version

    The app is build with NativeScript and works by interacting with Alya Network’s Internet of Things (IoT) service. If there was interest, I would explore communicating with the fan directly instead of through Alya Networks. The IoT world scares me a bit because users transmit personal data to a third party service they may not be aware even exists. Alya’s service collects name, address, email, and GPS coordinates. It’s scary to think what this data could be used for or it being leaked. There’s also the concern that the fan control app becomes useless if the internet is down or should the company shut it down.

    If you are using a Alya Networks based device or want to collaborate on using the code for other IoT projects please let me know by opening a Gitlab issue. I’m charging $4 for the app, but you can of course build it yourself for source. By purchasing the app, you’d support further development. Alya Networks dev boards aren’t free and would let me test out other configurations and device wifi connectivity.

    I do consulting work if you are a IoT company looking to improve your software. Get in touch with info at burkesoftware.com if you’d like to know more.